Pages

Saturday, January 31, 2009

Track T-Shirt Quilt


If I were more patient, I would have waited to combine these shirts with my other high school shirts to make a twin size quilt. However, these lap sizes are super convenient. I use this one more frequently on the couch than my larger quilts.

Finished size: 35"x50"

Class of '99 T-Shirt Quilt


I was very eager to get my hands on more t-shirts for another quilt, so as soon as my senior year was over, I cut up some of my high school shirts. Not being very school-spirited, it's not like I was going to wear them again.

Finished size: 34"x51"

Friday, January 30, 2009

My Antonia


My senior year of high school, I made this mini-quilt as a part of a project for AP English. It had something to do with My Antonia by Willa Cather, but now I have no idea what. It was the only book from that class I recall enjoying.

Finished size: 14"x25"

Thursday, January 29, 2009

Odyssey of the Mind T-Shirt Quilt


When I read a magazine article about making quilts out of t-shirts, I thought it was just the best idea ever! It was also this article from which I learned how to do the simple binding procedure I mentioned in my last blog post, so it really improved my quilting. To make a t-shirt quilt you of course need to have t-shirts you're willing to cut up, so they often require waiting. These shirts are from the three years I participated in Odyssey of the Mind.

Finished size: 56" square

Tuesday, January 27, 2009

Red and White


This was my first attempt at a quilt larger than lap size and the first of my own design. By this point I had also learned a simple binding technique. The circles were stitched on the top as part of the quilting. I love the red and white fabrics.

Finished size: 70" square

Monday, January 26, 2009

Cat Quilt


My third quilt progressed a bit. I saw the design in a magazine, but it must not have had any instructions. The faces are buttons and ric-rac. I was still unsure how to handle binding, but this one features a bias tape binding instead of just a blanket stitch. When I bought the fabric, the lady cutting it asked me what I was making. When I said a quilt, she asked, "Is it just squares sewn together?" Granted, this is not a terribly complex design, but I was still offended. I was 15, not 5. It may not be fabulous, but I was fairly impressed with myself considering my mom doesn't sew and I was figuring this all out on my own as I went.

Finished size: 28"x40"

Quilt #2


This was the first quilt I attempted on my own. It's not terribly advanced in terms of design or technique - like the wallpaper quilt, the edge is blanket-stitched.

Finished size: 22" square

Sunday, January 25, 2009

Miranda Is My Hero!

I have had my sewing machine for over ten years, and I have never known how to make it wind bobbins - which means I have been winding them by hand all these years. Since I got the machine at a garage sale, it unfortunately did not come with a manual. In a conversation with Miranda, she deduced what type of machine I have, thereby figuring out how the machine winds bobbins. She suggested I look online for instructions, which I found. I just tried it this weekend, and it works! Yay! This will make life soooo much easier!

My First Quilt

 
This was the very first quilt I made with my friend Sarah when she was a 13 and I was 14. Most of the fabric scraps are samples we ripped out of a book of discontinued wallpaper samples. A lot of time was spent washing the paper backings off. Isn't it attractive?

Finished size: 30-33" not quite square

Saturday, January 24, 2009

Friendship Quilt - Melissa


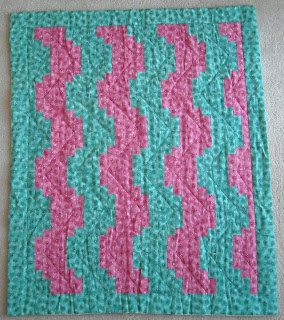
Melissa and I used our favorite colors to make these matching quilts. Hers has a pink border. I love the way the colors combine in this design, and the way the zig-zag quilting accents the design.

Finished size: 33"x39"

Friendship Quilt - Ann


Ann and I made matching quilts the year we graduated from high school. I did the piecing and she did the quilting.

Finished size: 36" square

Friday, January 23, 2009

Starry Wall Hanging


I absolutely LOVE these fabrics! This quilt hung on my bedroom wall for quite a while.

Finished size: 25" square

Thursday, January 22, 2009

Purple Pinwheels


I really like this pattern, it works very nicely for small projects. I love the fabric for the pinwheels, but it was a fat quarter, so I had to come up with a small project.

Finished size: 18" square

Star Pinwheels


I made this little quilt in 2000 with leftover star fabric from 3 different projects. Clearly I did not have much left, since the purple and green squares are only 1", but they went together so nicely. Each of the pinwheels has a star hand quilted in the center. That's about the extent of my hand quilting.

Finished size: 15.5" square

Wednesday, January 21, 2009

Denim Bag


I made this bag in high school, but it turned out so well that it is still one of my favorites.

Corduroy Bear


I really wanted to make a stuffed bear out of my old green corduroy pants. Unfortunately, his bean stuffing does not allow him to support his head in a sitting position, but I think he's really cute anyway.

Monday, January 19, 2009

Pin Cushion


Yet another project using the leftover baby quilt fabric. Since it's floral, I thought it worked well for flower petals. This flower is hot-glued into a tiny 1.5" ceramic pot. Unfortunately, attempts to take photographs of a side view did not turn out so well. I made this mostly because it was cute, but after completing it, I do not how I went so long without a pin cushion. It makes life a lot easier.

Sunday, January 18, 2009

Baby Quilt Fabric


I made this ornament out of the leftover fabric I used for a quilt I made for the baby of one of my friends. Unfortunately, in my excitement to mail the quilt, I forgot to take a picture of it, but at least you can see the lovely fabric here.

Try it yourself with this tutorial.

They're Not Coasters


These are the flat folded star ornaments I made. Be careful, they are easily confused with coasters.

Folded Star Trivet


Long before I started using this design for Christmas ornaments, I made a larger version to learn the folded star technique.

Saturday, January 17, 2009

Penguins


I could not resist making several of these adorable penguins for the ornament exchange.

Orange Owl


Julie was kind enough to send me a picture of this owl I made her as part of the ornament exchange (conveniently she is keeping it up all year). Maybe seeing how cute it is will encourage me to finish the one I started for myself.

Snowflakes


I saw an Instructable about how to make impressive snowflakes by simply sketching a design on the paper before you cut. I must say I think this method produces lovely results! It does help to have a very sharp pair of scissors though.

Friday, January 16, 2009

Orange Dragonfly


When my mom saw the dragonfly quilt, she wanted one too. They are a lot of work, so I agreed to make her something smaller, and I sent her a pot holder. Then Julie saw my mom's and she wanted one too. This is the one I made for her.

Thursday, January 15, 2009

Dragonfly Quilt


I was pleased to discover a quilt display when I went to the state fair this summer. I saw a dragonfly design using curved pieces, so when I got home I just had to figure out how to create one myself.

Finished size: 28"x42"

Wednesday, January 14, 2009

STAR Baby Quilt


In 2007 one of my STAR friends had a baby girl. I made this quilt for her 1st birthday. I had to go with a star theme since she's the first STAR baby.

Finished size: 35"x44"

Tuesday, January 13, 2009

Squirt Stars


I came across an online tutorial (via the Craftzine blog of course) for how to make these 3-D stars out of soda cans, so of course I had to try it with a can from my favorite soda. It's a good thing I don't drink a lot of soda or I'd have a whole garland out of these!

Monday, January 12, 2009

Christmas Ornament Exchange 2008


Before I moved, I helped Amanda create a dress form by wrapping her in duct tape. After we cut it off of her, she stuffed it and named her body-double Gwendolyn. She made me a mini-Gwendolyn ornament out of a doll by decapitating it, cutting off the arms and legs, and wrapping it in duct tape. This will be a year-round addition to the craft table.

Christmas Ornament Exchange 2008


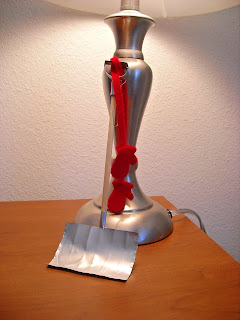
Since I wouldn't be able to take part in Amanda's annual ornament-making party, I invited her to take part in the ornament exchange. She and her partner Chris created this amazing shovel out of soda can. We have plenty of snow to shovel, so it's still on display.

Christmas Ornament Exchange 2008

In 2008 Julie and I continued the ornament exchange and she made me this fabulous star. I'm keeping it out all year long.

Christmas Ornament Exchange 2007


In 2007 Julie and I decided to exchange ornaments for Christmas, and she made me this awesome cookie cutter tree!

Sunday, January 11, 2009

South Carolina Ornaments


This is one of the Christmas ornament designs that I made for 2008. These are not particularly Christmas-themed, but it was the perfect use for the tiny South Carolina logo I salvaged from one of Zack's old visors and my little Clemson tiger paw patches.

Try it yourself using this tutorial.

Saturday, January 10, 2009

Recycled Clothes Bag

I couldn't bear to part with this outgrown shirt and pair of corduroys, so I recycled them into a bag. It was an experiment with eyelets, which are fabulous, and I can't imagine why I haven't used them before! The inside of the bag is lined with the back of the shirt. (I still have the front of the shirt for a future project!) The strip on the outside is from the sleeve of the shirt, and was used to camouflage the fact that a pair of pants didn't produce a large enough single piece of fabric.

Dimensions: 3" x 9.5" x 8"

Cool as a Moose T-Shirt Bag


I was saving t-shirts for another t-shirt quilt, but when I went through them, I decided that I wasn't sufficiently attached to most of them to warrant a quilt. This one was a particular favorite from a trip to Maine when I was in high school, which I would still wear if it weren't huge, so I wanted to do something special with it. Since I love bags, this seemed like the perfect solution! The outside is canvas, and the inside is lined with the back of the t-shirt.

Dimensions: 4" x 8" x 8"