Wednesday, December 30, 2009

Reindeer and Penguins


Christmas 2007: I was working in a craft store. Constantly being surrounded by crafts was a test of my willpower, but at least I got an employee discount! I had purchased my tree after Christmas 2006, so this would be the first year it was decorated. Naturally, I had to stock up on clear glass bulbs to decorate. I couldn't pass up these adorable reindeer and penguin stickers.

Tuesday, December 29, 2009

Grandpa's Ornaments

Zack's grandpa is very creative. I thought I'd feature some of the Christmas decorations he has made:

Crab Shell Santa


Mr. and Mrs. Snowman,
made out of light bulbs


Candy Cane Santa


(If Zack received any of these artistic genes, you'd never know it; I can't even get him to draw a stick figure. He did, however, assemble the puzzle ornament my dad sent for Christmas.)

Monday, December 28, 2009

Christmas Ornament Exchange 2009


At first I wasn't sure if this was an ornament or an accessory, but it is an ornament, conceived and constructed by Amanda's husband, Chris. In case you can't read the beads, they say "Rowdy Librarian." Last year I told Amanda that I'd seen a bag that said "Beware: Rowdy Librarian," so she made me a shirt with that phrase and an image of red, rhinestoned glasses on it. It's a tank top, so I don't get to wear in out of the house much with the weather here, but I think I will keep these glasses at work!

Sunday, December 27, 2009

Christmas Fabric


For Christmas, my mom sent me the results of her Joann's shopping extravaganza. The Joann's near my parents house clearly has a different selection of fabric, as I've only seen the green leaf print at my Joann's. I also received thread, quilt batting, and machine needles, all of which will come in handy for the quilts I plan to start in 2010. Thanks Mom!

Saturday, December 26, 2009

Christmas Ornament Exchange 2009


This is one of the fabulous ornaments I received from Amanda in our exchange this year. The bulb is filled with tiny paper cranes in red and silver. She has been mailing me envelopes of paper cranes all year.

Thursday, December 24, 2009

Christmas Card


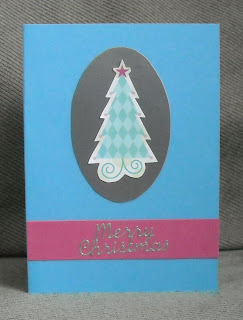
This is a special edition Christmas card. The box of cards I bought said 20, but I only ended up with 19, so Mom and Dad were the recipients of a home-made card. The tree is from a scrapbook spread I did in 2005, the last time I was home for Christmas, and the "Merry Christmas" sticker is from my 2004 tree cards.

Saturday, December 19, 2009

Mini Mailbox Ornament


This is the ornament I made for my pen pal. The mailbox is made out of two soda cans, and the flag actually moves! I wasn't sure how it was going to turn out, but it has miraculously stayed glued together. Originally it wasn't going to be sparkly, but I had to camouflage my super glue fingerprints in a few spots. I was thrilled with it until I decided to make mail for it, then I was even more pleased! I love the little postcard! I scanned a real postcard, re-sized it, printed it out on sticker paper, and attached it to some poster board. The stamp for the envelope is also printed out on sticker paper, so it is like a real stamp, not just printed directly on the envelope.

Wednesday, December 9, 2009

Snowflake Ornaments


This blue fabric was originally purchased for Amanda's quilt and I loved it so much, I bought more for myself. I knew I wanted to make snowflake-themed ornaments with it, so I searched and searched until I found this sparkly white fabric that was just perfect. I had already purchased this snowflake brads thinking I might use them for Christmas cards. They worked perfectly since you can poke the prongs easily into the styrofoam. I decided they needed a little glitz so I coated them in glitter paint. There's also a snowflake on the top securing the ribbon.

Try one yourself using this tutorial.

Saturday, December 5, 2009

Tree Card


These were my Christmas cards my second year of grad school. I absolutely love the "Merry Christmas" stickers. When I first moved to North Carolina, I was thrilled to discover a little scrapbook store not far from my apartment. It ended up closing, which was tragic because I have yet to find another store that has stickers like this, and I would love to have several other phrases. "Happy Birthday" would be particularly handy.

Thursday, December 3, 2009

Angel Card


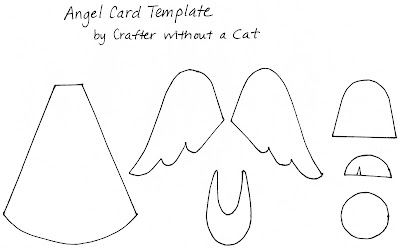
I made these Christmas cards my first year in grad school as a creative outlet since my sewing machine was broken, which was probably a good thing since paper is cheaper than fabric. All the angel pieces are individually cut out, so I only made about a dozen. I loved them so much though that I had to keep one for myself.

Download the template to make your own.
 

On my card, the head is the size of a nickle and the body is 3" from top to bottom.

Sunday, November 29, 2009

Tree Skirt


I got my Christmas tree on sale after Christmas 2006. Once I had the tree, I realized I needed accessories. This tree skirt is one of the few projects I've made that I can say is completely hand-sewn. I think I figured it would be easier to hem a circle by hand than on the machine. The center hole is bit bigger than necessary, but it turned out pretty well considering I made it before taking the tree out of the box. I used some of the left over fabric for some of the ornaments I made last year.

Friday, November 27, 2009

Kitty Ornament


My mom and sister love their cats, so last year I made them these kitty-themed ornaments. They're one of my favorite designs - I love the paw print fabric and the kitty button! Thanks again to mom and dad for sending a picture.

Try one yourself using this tutorial.

Thursday, November 26, 2009

Christmas Ornament 2008


These are the Christmas-themed ornaments I made for my family members last year. Thanks to my parents for sending a picture since I didn't make one for myself. Instead of covering the seam with matching fabric as usual, I used gold ribbon on these. The buttons on the top are little red hearts. You can see the fabric a little better in the picture of my tree skirt.

Try one yourself using this tutorial.

Tuesday, November 24, 2009

Dabbled Feature

Decorating for the holidays? Check out Dabbled.org for a round-up of Handmade Christmas Ornament Tutorials. You may recognize a certain shamrock ornament.
For more ideas, there's also last year's feature, Bunches of Christmas Ornaments.

Sunday, November 22, 2009

Quilt Block #51


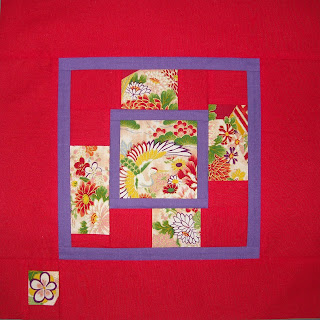
I created this block solely because I wanted to use this bird. I originally purchased 1/4 yard of this fabric just because it yielded several different designs for my Cathedral Window quilt. The bird is also featured there, and I liked it so much I felt the need to highlight it a bit more in another project.

Saturday, November 21, 2009

Pumpkin Cards


These are my Thanksgiving cards for this year. I know the pumpkins might be more appropriate for Halloween, but they were just too cute to pass up. They're not as intricate as last year's, since I used stickers instead of cutting out paper leaves. As you can see, I couldn't decided whether I liked the orange or green background better. When it came down to actually reading what I had written in them, I decided the orange was a better choice.

Monday, November 16, 2009

Quilt Block #50


I love this block mostly because it is so very accurate. All the intersections are unusually precise for me, which is amazing considering I didn't do anything different to achieve this. Despite the picture, it is actually square.

Sunday, November 15, 2009

Quilt Block #49


This block turned out to be exactly the design I had in mind, but I think the solid red and brown fabrics detract from the overall look. I really like the red and brown print, but it didn't end up standing out.

Saturday, November 14, 2009

Quilt Block #48


This block is admittedly kind of boring. However, it's exactly what I had in mind, so in that respect it turned out well. I just wish I had considered ahead of time my trouble with matching seams.

Thursday, November 12, 2009

Quilt Block #47


Some time it amazes me how long it takes me to pair fabrics with a design. This block, which should have come together a lot sooner, is a perfect example of that. This design has been on my list of possibilities for a while, and it's the perfect fit for these fabrics. I had only a little bit of the daisy fabric left over from the pot holders and butterflies I made for my aunt, and I wanted to make sure you could actually tell that the yellow fabric had polka dots, so I needed a design that maximized one fabric and minimized the other. Voila!

Wednesday, November 11, 2009

Quilt Block #46


I really like the colors in this block. The blue and green fabrics look great together, and the fact that the design on the blue fabric doesn't line up doesn't really detract from the overall effect. However, I do wish that I'd paid attention to the little clusters of dots so that they were all properly oriented.

Tuesday, November 10, 2009

Quilt Block #45


I started this block with nothing particular in mind, except attempting to build something out of the four flower squares. For a block without a concrete plan, I'm pleased with the way it turned out.

Monday, November 9, 2009

Quilt Block #44


I have, at long last, resumed the Quilt Block Project with the goal of completing either 45 or 48 blocks (3 quilts of 15 blocks each or 4 quilts of 12 blocks each). I think now I might go for an even 50, so I'll have replacements for a couple of the less attractive blocks.

For this block, I was inspired to use left over bits of a fat quarter I originally made use of in my Cathedral Window quilt. I was not at all sure how this color combination would work, but I love it! This is definitely my new favorite block!

Saturday, November 7, 2009

Replacing Windows


Last month I got some new fabrics, and I was kind of sad that I couldn't fit them into my Cathedral Window quilt. In my impatience I had included these six not-so-attractive blue fabrics, so I replaced them with the new fabrics, which are much more attractive.

Sunday, November 1, 2009

Quilt Will

I am not yet 30; I don't have a regular will.

However, I decided I wanted to leave a list of which quilts I wanted my friends and family members to have should I die. Living so far from where I spent most of my life, Zack hasn't met most of my friends, so he would have no idea who should get one, let alone which one. I compiled pictures of them and put everyone's names next to the ones I want them to have. Obviously, like any real will, it will change over time, as I make more quilts.

I don't think this is that odd. Like any other important possession, I imagine this is something other people might include in a will, or at least make some similar provision.

My mother thinks this is morbid and doesn't understand why I think of things like this. Nonetheless, she also thinks she should get all my quilts. My sister thinks she should trump my husband because she's known me longer. Zack commented that even though we're married, I only left one to him. (It is my favorite.)

Regardless of what they think, it makes me feel better.

Sunday, October 18, 2009

Clemson Hat


This was the extent of my weekend crafting. It took me about half an hour. I am always wearing Zack's Clemson hat, so, rather than spending an unreasonable amount on a hat because it has a tiger paw on it, I decided to make my own. (These patches are so handy!) He says this fleece is not Clemson orange, but it's not like I was going to find fleece in several shades of orange. Plus, it was on sale for 60% off and it has a cute tiger paw patch on it now and that makes me happy. I can wear it with the Clemson fleece jacket I made. Being orange, it probably won't get as much use as the one I made last year though.

Saturday, October 10, 2009

Pink Paper-Pieced Star


I saw a quilt on Flickr and it had a tutorial for a square star block, instead of the rectangular blocks I have used in the past. I love stars, so I just had to try it! I had been wanting to use this combination of fabrics, and this was the perfect project. Unfortunately, I only have two fat quarters of the pink fabric and 1/2 a yard of the sparkly white fabric, so I'm hoping I can get six blocks. They should end up being about 14.5" square.

Finished project.

Sunday, October 4, 2009

Bento Box

This top was finished in June, but I just got around to quilting it.


I put it off hoping inspiration would strike and I would come up with a brilliant design for the back. Alas, I gave up on that idea and the back is just plain. I ran out of the paisley fabric (it was a clearance rack purchase and had already been used for a couple other projects), and I just wasn't enthused about any of the designs I came up with using just the green, pink, and blue fabrics.

I am, however, very pleased with the quilted design, even if it required turning the quilt a zillion times.


Finished size: 36"x47"

Sunday, September 27, 2009

Yo-Yo Pumpkin Tutorial

Here's what we'll be making today:


Materials:
  • 1/4 yard each of two coordinating orange fabrics
  • Needle and thread
  • Scissors and pen
  • Circular templates in the following sizes: 4", 5", 6", 7"
  • Hot glue gun
  • 1/8" dowel
  • 1/2" spool
  • 1" disc
  • Brown paint and brush
  • Fake leaves

Saturday, September 26, 2009

Yo-Yo Pumpkin


One of my co-workers had these adorable yo-yo pumpkins on her desk so I just had to make one! It's about 3" tall. They are super easy to make.

Try making one yourself using this tutorial.

Wednesday, September 23, 2009

Sequin Trees


These little trees are about 3" tall. They are decorated with sequins and seed beads and stuffed with a little quilt batting. The edges are finished with a slightly off-kilter blanket stitch. I realized it was wrong after the first one, but I decided it looked better that way.

Saturday, September 19, 2009

Pink and Orange

It feels like I've been working on this quilt forever. I think that's due in part to the fact that it took me forever to decide how I was going to quilt it; or rather, I knew it needed a lot more quilting than other quilts if I wanted it to look decent, so I kept putting it off, hoping to come up with an alternate idea. I quilted the pink sashing twice, a quarter inch from each edge, using pink thread. Then I quilted all the stars twice, a quarter inch inside and outside of each, using orange thread. It did produce a lovely effect, and it wasn't that much work, once I got started.


For the half squares, I drew out half the star design and pinned the paper to the quilt as a guide. The squares on the back didn't quite line up the squares on the front, but fortunately both thread colors look nice on either fabric.


It's going to New Zealand, to one of my sister's friends who's having a little girl in January. It's a bit big for a baby quilt, but I didn't know where it would end up when I started it.

Finished size: 41"x56"

Wednesday, September 16, 2009

New Wall Art


I've added my starry scrap quilt to the collection on the wall. It was time to get it off the chair, so I super glued two clothes pins to a dowel, painted it silver, tied on some fishing line, and voila! - a quilt hanger!

Here's a close-up of the very high-tech contraption:


It's only been hanging since yesterday, so I hope it continues to hold!

Tuesday, September 8, 2009

Holly Ornaments


My mom requested 5 of these ornaments as gifts for her friends this year, so I thought I'd better get started early. Since the styrofoam balls come in packages of 6, she gets one for herself too!

Try making one yourself with this tutorial.

Monday, September 7, 2009

Almost Finished


All 172 inside squares are complete! Only 40 squares for the border to go. It is not quite a charm quilt, but the squares are very unique nonetheless. For the ones where I cut multiple squares from the same fabric, I used fabrics with different designs.

For instance, these two are from the same fabric:


Finished size: 36"x54"

Saturday, September 5, 2009

Quilt Block #43


This block was yet another reason why a digital camera is a very helpful quilting tool. I wasn't sure if I preferred red or purple in the center, and while this was the original design idea, I also experimented with a different design. I love the combination of these fabrics so much, I'm tempted to create a whole new project around them, but the red and pink fabrics are just fat quarters, so there's not much left to work with.

Tuesday, September 1, 2009

Quilt Block #42


I'm not usually a huge fan of fussy cutting because it can be such a waste of fabric, but this block wouldn't have quite the same effect with the red star burst squares. This was the original design I came up with, but I played around with several alternatives before finally settling on it. I love the contrast of these colors! They were both fat quarters originally purchased for my Cathedral Window quilt, so I wish I had more.
Related Posts Plugin for WordPress, Blogger...