Showing posts with label 2017 projects. Show all posts
Showing posts with label 2017 projects. Show all posts
Saturday, March 31, 2018
Fabric Easter Egg
Oh, the joy of twins! You get to make two of everything at the same time, instead of going back three years later and making a second of everything you made the first kid. This egg is for my newest niece. It matches her quilt. I actually thought about making an egg before I thought about making a matching Christmas ornament. This time, I realized we had a metal nail file, so I had a better tool for stuffing the fabric into the Styrofoam.
Labels:
2017 projects
Sunday, December 17, 2017
3-D Printed Mailbox
It's the 10th anniversary of the ornament exchange so I 3-D printed a mailbox! I used a design I found on Thingiverse. It's not my first mailbox ornament, though it's a definite improvement, even though it's not technically an ornament since it doesn't hang. It was designed to be used as a bank, so it has a working flap so you can actually put things inside, which is awesome.
 |
| Door open |
Labels:
2017 projects,
mail
Saturday, December 16, 2017
Mini Fireplace Christmas Decoration
Since the book cart and then the bus, I have been determined to make Amanda an ornament that lights up. This is not technically an ornament since it doesn't hang, but I think this is as close as I am going to get. Unfortunately, you can't really tell the difference between the photos with the lights on and off.
This ornament/decoration required more assembly than actual creation. I made the tiny stockings and the felt fire, but everything else is store-bought. The fireplace is from the doll house section of Hobby Lobby. I bought the string of lights first, determined to figure out something to do with them, but it's hard to create an ornament around a 9' string of lights and a battery pack that requires 3 AA batteries.
 |
| Lights off |
 |
| Lights on |
Sunday, December 10, 2017
Pink and Purple Ornament
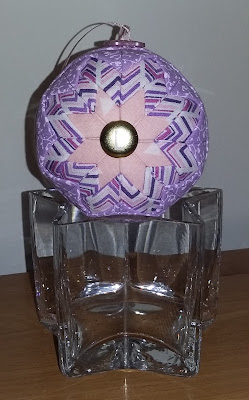
This ornament was made to match the triangle baby quilt. It's not quite an exact match to Claire's ornament, since my sister chose an L name for this baby and I had already used the rest of the L brads on previous ornaments. I bought these larger, flat, gold brads because that's all I could find. I don't love gold, but I think it looks fine with these fabrics. I was afraid the brads would be too large, but I think the bigger brads actually work better. I do miss the look of the embossed letters though.
Try making one yourself with this tutorial.
Saturday, December 9, 2017
Hexagons
I made this for Amanda for with the hexagon blocks her grandma gave me a couple years ago. Since the blocks were all hand-stitched, I hand-stitched most of it as well. (It looks fine on the front, but not so much on the back.) I attached the binding to the front by machine, and attached it to the back by hand. It's too big to be an ornament, but I'm sending it to her along with my submissions for our Christmas ornament exchange.
Finished size: 11.75 x 11.75"
Sunday, November 19, 2017
Triangle Baby Quilt
This quilt is for my new niece. Julie chose a more muted color palette than Claire's airplane quilt. I didn't love the colors at first, but I am really happy with the way it turned out. When Julie told me she wanted a triangle quilt, I bought a triangle template because I hate cutting triangles with my rectangular ruler. Fortunately I bought most of the fabric before we moved because we don't live anywhere near a fabric store now.
I quilted it with a zigzag pattern similar to Claire's quilt. Julie wanted a grey binding, so I went with the same silver fabric as my last scrap quilt. Eventually I'll get back to the quilt for which I originally bought this fabric!
Finished size: 41" x 58"
Sunday, November 12, 2017
Stuffed Unicorn
A while ago, Claire found a scrap of fabric and announced to Julie that she needed me to make her a stuffed horse with a saddle. (The saddle was very important.) Once Claire found out I was moving closer, she was very excited that I could bring my sewing machine to her house. (Julie also started lining up sewing projects it wouldn't have made sense to mail me.) I started looking for a pattern and found one for Henry the Horse in Jill Hamor's book, Storybook Toys. Claire loves unicorns so we added a horn. It came out fairly well considering my lack of experience with 3D patterns.
Sunday, October 29, 2017
Jack O' Lantern Halloween Treat Bag
This is Claire's Halloween treat bag. The C is an iron-on patch. There were no sequined Cs like I used for the twins, and only one pumpkin. The pumpkin is actually a sticker. I bought it thinking it was an iron-on patch, but fortunately I realized it wasn't before I tried to iron it. This bag was also made in May, and fortunately the sticker is still attached, since I was worried about its continued ability to stick to fabric.
Finished size: 5.5"H x 5"D x 4"W plus handles
Labels:
2017 projects,
bags,
Halloween,
rhinestones
Saturday, October 28, 2017
Sequined Halloween Treat Bags
Halloween treat bags for the twins, made specifically to fit the miniature pinatas I found in the party section of Target. I bought the pinatas in May, because pinatas are a super fun candy delivery method! Fortunately I also made the bags in May as well, since another interstate move upset the craft schedule all summer. I found these sequined iron-on letter patches on clearance at Hobby Lobby. I love having initials on hand to personalize projects like this!
Finished size: 8"W x 6"H x 4"D plus handles
Labels:
2017 projects,
bags,
Halloween,
sequins
Sunday, July 9, 2017
Map Ornament
While visiting San Antonio with my parents, I bought a Texas Christmas ornament, and it occurred to me when I got home that I didn't have a North Dakota ornament. I was cleaning up my maps after our trip when I realized that a map ornament would be the perfect way to recycle a map I didn't need anymore. Fortunately, Bismarck is small enough that it fit nicely on this star! It is very similar to my rainbow ornament - just a wooden shape mod podged with paper and a grommet to finish the hole I drilled.
Labels:
2017 projects,
mod podge,
ornaments,
stars
Sunday, June 25, 2017
Penguin Stockings
My sister is having another baby in November! This meant doubling all the stockings I made earlier this year. I found these cute penguin brads and knew they would be perfect for stockings. The set also had blue and green penguins, so those may show up in later stocking designs.
The blue snowflake fabric was the only one I didn't have enough of to duplicate, so that will be for Claire this year, and the new baby will get a different design.
Labels:
2017 projects,
Christmas,
penguins,
stockings
Saturday, June 17, 2017
Saturday, May 20, 2017
Scrap Quilt #3
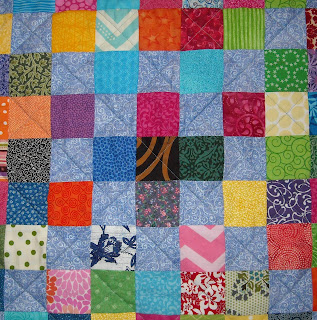
I started this quilt in 2015, right after finishing my last scrap quilt. Then we moved, and all the little squares got packed up. It is 25 blocks of 49 2.5" squares.
The Irish chain design is a little harder to see than I anticipated.
The Irish chain design is a little harder to see than I anticipated.
 |
| Close up of the design |
Labels:
2017 projects,
quilts,
scraps
Saturday, May 13, 2017
Saturday, May 6, 2017
Green Boxy Bag
I made yet another bag! This one will go to the same little girl who is getting the orange purse. My mom got me this green fabric quite a while ago and I've never found enough matching fabrics to turn it into a quilt. The lining fabric matches the handle. The set of vehicle buttons I got for the car boxy bag included planes and trains as well, and I thought this little grey train button matched nicely for the zipper pull.
Finished size: 3.5"H x 4"W x 8.5"L
Labels:
2017 projects,
bags,
zippers
Saturday, April 29, 2017
Blue Heart Bag
Seriously, I can't get enough of this purse! (This is #6.) I love this orange version. It is lined with blue. I would make more with this orange fabric, but I'd need more blue lining fabric. It was surprisingly challenging to find a blue heart button, but I am very pleased with the glitteriness of the one I found. It is going to the little girl who received the blue birds quilt.
Previously:
Labels:
2017 projects,
bags
Saturday, April 22, 2017
Princess Bags
Claire loves princesses. My mom told me they were looking at princess fabric at Joann's and she told Claire that I could make her something with princess fabric. Then I get a text from my sister, "I hear you have princess fabric? Claire needs a bag for all her princesses." I clarified that I did not have princess fabric, but yes, I could make a bag. Julie sent this super cute princess print. We had settled on a wristlet design, but the size of princesses necessitated making the bag a little bigger in order to accommodate all the fabric princesses (hopefully it's big enough for all the princess figurines). When I called Julie to discuss dimensions, she asked Claire, "Do you want one row of princesses or two rows of princesses?" Of course she picked two. Since it was going to be so much bigger than a wristlet, I added d-rings and an optional shoulder strap.
 |
| The lining is a pale yellow with a strip of the same star print that's on the outside |
Finished size: 12"W x 8"H x 4"D
Labels:
2017 projects,
bags,
zippers
Saturday, April 15, 2017
Saturday, April 8, 2017
Flower Purses
I had planned to send our twin nieces two of the batik bags I made for Easter, but then my mom asked for a third for the youngest of the sisters she babysits. Since I didn't have enough fabric left for another, I decided to make two more for the twins out of this floral print so the sisters would all have matching bags. This floral fabric is very Eastery, and I was pleased to find these perfect pink flower buttons.
Labels:
2017 projects,
bags
Saturday, April 1, 2017
Car Boxy Bag
After I made a bag like this for Claire last year, I commented to my sister that I should make one for Claire's friend Jack too. She said he would love it for his cars, and I knew the fabric from the car quilt would be perfect. However, I didn't have a wide enough piece left, and it took me awhile to brainstorm the idea of making a road to make it wide enough, despite that being the pattern of the quilt this fabric is from! I used an orange polka dot fabric for the lining and found a cute car button to use as the zipper pull. Orange would have been perfect for a bit more contrast, but the blue works too. I used my machine's letter stitch to stitch BEEP BEEP on the handle, since it also says BEEP on the fabric.
Finished size: 4"W x 3.5"H x 8.5"L
Labels:
2017 projects,
bags,
zippers
Subscribe to:
Posts (Atom)


