Showing posts with label 2016 projects. Show all posts

Sunday, December 18, 2016

Mini Quilt Ornament


A couple years ago I had the idea to make Amanda a mini-quilt ornament. I am glad I waited for inspiration because it is much better as a Lisa Frank mini-quilt ornament than anything I would have previously made! Each image is 1" square. I used Jolee's Easy Image transfer sheets. They were different than the printable, fusible fabric sheets I used for the fabric photo book I made last year. (Coincidentally, I used the same pink fabric for both projects!) Those were fabric-y -- you printed and ironed -- where these you print, iron, and peel off the backing for a transfer. These worked much better for this project.

Finished size: 4" x 5.5"

Saturday, December 17, 2016

Armadillo Ornament


In honor of the fact that Amanda and I now both live in states with armadillo populations, I decided to make her an armadillo Christmas ornament. My original plan was to get a plastic armadillo figurine and wrap it in a strand of tiny Christmas lights. Alas, armadillos do not seem to be popular plastic figurines. Instead I decided to use my transfer sheets to print an armadillo and transfer it on to fabric and stuff it. Once I thought of this, I did briefly consider making a more 3-D version, but I couldn't find a suitable pattern. This version is stuffed to add some dimension. Fabric sewn right on the edge of an iron-on transfer was not fun to turn, as the transfer made it stiff, but I persevered. Unfortunately, this version did not take kindly to being wrapped in a strand of tiny lights, and his head is not appropriately shaped for a Santa hat!

Finished size: 5" x 2.5"

Sunday, December 11, 2016

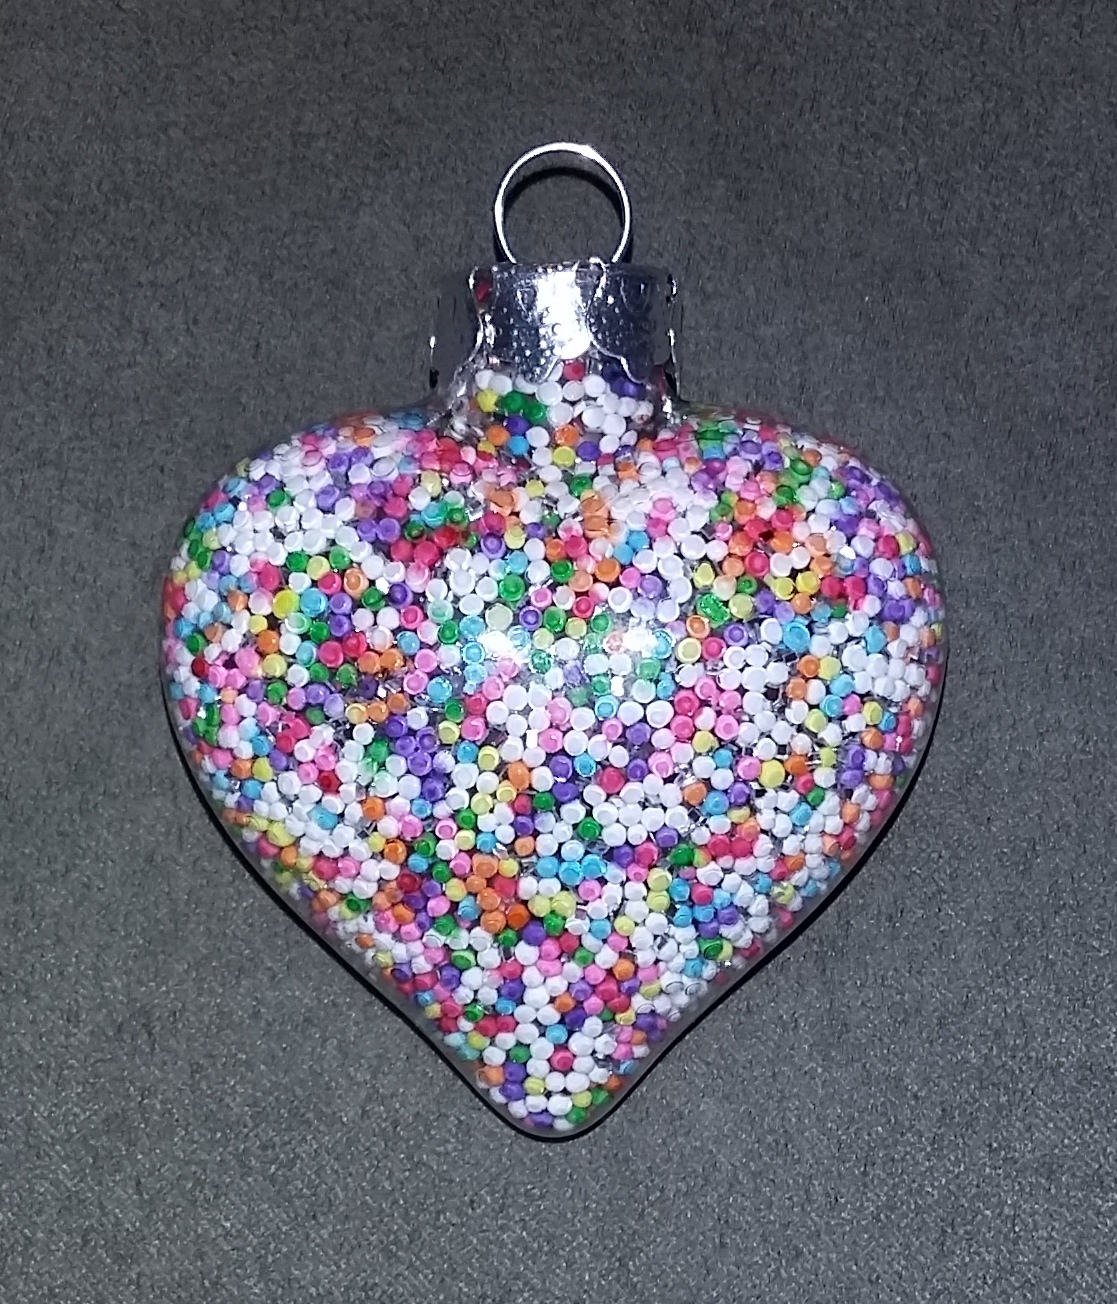
Rainbow Sprinkles Ornament


Once I saw an ornament with sprinkles inside, I knew I had to make one for Amanda. It was just too rainbowy not to! I used a heart shaped ornament because that's what I had on hand, but a round one would definitely be easier. The challenge with the heart shape is that the varnish pooled in the top of the heart and was much harder to get out and thus coat evenly. The sprinkles at bottom of the heart look much better because that varnish had dried longer. For as simple as this is, it does require a lot of attention. Nonetheless, it's so colorful that I may have to make one for myself!

Saturday, December 10, 2016

Unicorn Stamp Ornament


I started using a canva.com at work this year, and it includes this stamp image. When I saw it, I immediately decided to make a unicorn stamp for Amanda, which I set in this pendant to turn it into a Christmas ornament. I glued it in using Mod Podge. There's a bit of glitter glue around the edge and on the unicorn's horn. I then applied Mod Podge Dimensional Magic to fill in the pendant. The ribbons are glued to the back of the pendant with a little snowflake decoration.

Sunday, December 4, 2016

Split Rails Quilt


I have had this fabric a long time, and it was one of my goals to finally turn it into a quilt this year. It should have been one row wider, but, as I've been meaning to get around to this for awhile, I also bought the solid fabric sometime ago, hoping it would motivate me, and I didn't have enough for one more row.


Once the top was done, I put off quilting it because I didn't want to do straight, criss-crossed lines, but that's what worked best and I like how it turned out better than I thought I would.


Finished size: 60" x 84"

Saturday, December 3, 2016

Another Pair of Pink and Blue Ornaments


This is the third and last set of pink and blue ornaments! They are for Claire's friend Jack and his new sister. I made these over the summer as well, and I just had to wait for the new baby to arrive to finish up the personalization. The blue ornament is the same as the first two, but the pink one is more like another ornament I made that I really liked.

Try making one yourself with this tutorial!

Sunday, November 27, 2016

A Purse with Pizzazz


I couldn't help myself; I made Claire another purse. This is the fabric I wanted to use for the red purse. I had seen this pattern awhile ago and thought it had a bit more style. I did make a few adaptations. First, I made it one inch longer. Second, I did not gather the lining (which is a plain, solid red fabric), I pleated it just like the outside of the purse so the shape would match and it would fit better. Third, I did not do a button closure. This button is purely decorative. The glittery heart button was a great match for this fabric, but I didn't think the shape would work very well as an actual closure, and I had another magnetic closure that I figured would be ideal. Instead of top stitching after attaching the band to the body of the purse, I waited until the bag was completely assembled to top stitch, thus giving more stability to the band for opening the magnet. 

Finished size: 8" wide at top, 9" wide at bottom, 7" long at center

Sunday, November 20, 2016

One Very Red Purse


Julie sent me a text asking if my machine could sew leather or fake leather. When I asked what she wanted me to make, she sent me a photo of a purse. I told her I would make it, but that it didn't need to be made out of leather. Claire really likes red, so despite sending photos of some cute red prints, we settled on plain, solid red fabric. As a result, I used a very red patterned fabric for the lining instead. There is also a small pocket on the inside. The purse Julie saw had a big bow on the front, but we decided to go with a button instead. I was pleased to find a sparkly heart button, despite the fact that there's not much contrast. I decided to go with a magnetic snap, which I'd never used before, instead of Velcro for the closure. I really like it, but the magnet is so strong I'm afraid it will be difficult for Claire to open. Hopefully it's red enough for her and she likes it!


Finished size: 7" wide, 5.5" high, 2.5" deep

Sunday, November 13, 2016

Santa Stockings


I used this Santa fabric to make some bags last year, and I wanted to use up the little bit I had left, so I decided to pull out my stocking template, which I'd last used in 2012. I was able to make six, and they will make nice little treat bags for Claire and her friends and the kids my mom babysits.

Finished size: approximately 3.5" x 5"

Sunday, November 6, 2016

Mini Quilt Ornament


This is my second mini quilt ornament, but the first is actually for Christmas so it will be posted later. After I made the first one, I realized I needed to make a Doctor Who themed one for a friend who just happened to have an October birthday, so why wait until Christmas?

If you are not a Doctor Who fan, the images include a TARDIS, a Dalek, a Cyberman, K-9, and a Weeping Angel. 

Finished size: 4" x 5.5"

Sunday, October 30, 2016

Pumpkin and Owl Halloween Treat Bags


These are the treat bags I made for the nieces this year. A yard of fabric made four bags, so I sent the extra one to Claire for her best friend, Jack. One of Claire's many costume brainstorms was that she would be a rainbow and Jack would be a cloud.

Sunday, October 23, 2016

Baby Doll Bibs


Gerber Baby did not stay dressed long. Nonetheless, Claire wants a high chair for her doll for Christmas, so I thought bibs would make a nice accessory. Fortunately I found a pattern. I made one to match the set of kitchen accessories I made for Claire's play kitchen last Christmas. The other matches a pillow I made for her play room. They close with Velcro, the buttons are just for decoration.

Finished size: 4.5" x 5.5"

ETA: Fortunately they fit Gerber!


Sunday, October 16, 2016

A Little Bird Doll Quilt


I bought a fat quarter of this bird fabric with no plan, just because it was cute. After talking to my sister, I knew it would be perfect for a doll quilt for one of Claire's friends.

Finished size: 17.5" x 21"

I had to go back for another fat quarter so I could make a matching bag:


Finished size: 3" x 6.5" x 6" plus handles

Sunday, October 9, 2016

Baby Doll Dress


Growing up, Julie and I both had Gerber Baby dolls, and Claire has now adopted Julie's. Gerber Baby isn't usually dressed when I see her, and when we video chatted recently, Claire asked me to make pajamas for her doll. (I suspect this request was prompted by my mom, as GB has big drool stains on the cloth part of her body.) I have made doll clothes for my American Girl doll, but those were hand-stitched and I didn't have to worry about a 2 year old being able to put them on her doll. However, you really can't say no to your adorable 2 year old niece, as she won't understand that you aren't very good at making clothes, so I offered to make a nightgown - which would eliminate sleeves and legs - cutting my mom off as she suggested I make Claire and Gerber Baby matching pajamas, since clothes for Claire would actually have to fit properly. It remains to be seen if this will actually fit Gerber Baby, as the pattern is for a 16" Waldorf doll. I figured a 2 year old could handle a wrap style dress with Velcro closures, though this one is not reversible, as I didn't think a 2 year old would yet have the fine motor skills to manage the closure on the reversible style.


This was supposed to be a nightgown, but after I finished it, I was worried it might be too short, so I decided Gerber Baby needed a pair of bloomers. I used a pattern, making the curve of the leg a bit larger, since Gerber Baby is a bit bowlegged. The legs ended up longer than I anticipated, and I'm concerned they ended up a bit short in the waist, but I'm considering this a test, and I will adjust as necessary once I see how they fit. Hopefully the waist is snug enough!


ETA: Here is Gerber Baby all dressed up!


Julie said everything fits well enough. The pants are a little long, but they stay up at the waist. It's a bit hard to get her arms in and out of the top, but Gerber Baby has tricky arms, and the top actually looks looser than I expected.

Sunday, October 2, 2016

Hopper Magnets


I finally bought a 1" hole punch; mostly so I could make these magnets, but it will come in handy for making other items as well. They are epoxy stickers covering Edward Hopper paintings. Edward Hopper is my favorite painter and for years I had calendars of his artwork. Most people will know him for Nighthawks, but these are some of my favorite images.

Clockwise from upper left: Chop Suey, New York Restaurant, Table for Ladies, Compartment C Car

Sunday, September 25, 2016

Pointed Star Ornament


Christmas ornament season has officially begun! I've already made several ornaments this year, but I hadn't given much thought to the ornament exchange with Amanda until September, which is unusually late for me! (The earliest I've started is February). This ornament is for me though. In 2013, I made two versions of this ornament - a snowflake one for Amanda and a holly one for mom - but I didn't have enough of either fabric to make one for myself. Fortunately I had some scraps from Melissa's tree skirt that were long enough (I really love this fabric), and I'd conveniently linked to the tutorial in my original post. Where as the snowflake was flat and the holly ornament just had points on one side, this one has points on both sides.

Sunday, August 28, 2016

More Pink and Blue Star Ornaments


Since Styrofoam balls come in packs of six, I try not to make these ornaments one at a time because I don't want to store a bunch of extra balls. So after I made two more ornaments for the kids my mom babysits, I had to find more recipients. Conveniently, one of my friends was expecting a second baby in September, and I hadn't made his first baby an ornament. I knew I had a P brad for their daughter, but after running out of C brads, and using up all the Es and Ls as well, I was concerned about what they might name their son. Fortunately, I had an F. Otherwise, I would have used rhinestones for both. Other than the brad/rhinestone in the center, the blue ornament is exactly the same as the previous blue star ornament, but the pink one is different. Since these are going to siblings, I made them much more similar than the other two, using the same fabric on the outside ring.

Try making one yourself with this tutorial!

Sunday, August 21, 2016

Pink and Blue Star Ornaments


When Claire was born, I made her an ornament, and I also made ornaments for the four kids my mom babysits. That was two years ago. This year, both families had a third baby, so I made ornaments for them as well. One family had a girl, so she got a pink ornament. One family had a boy, so he got a blue ornament. All the ornaments for the older siblings had brads with their initials. However, both sets of kids have names that start with the same letters - each family has an E, L, and C. Since Claire is also a C, the third C baby was out of luck - I was out of C brads and couldn't find them anywhere. I went to two Hobby Lobbys, I had people looking in other states, and nothing turned up online no matter how I searched. So the third C baby gets a rhinestone star, and it just turned out to be terribly convenient that I chose star fabric and already happened to have the star rhinestones!

C ornament #2
E ornament #1
L ornament #1
L ornament #2

Try making one yourself with this tutorial!

Sunday, August 7, 2016

Baby Car Quilt

After the alligator quilt, I thought it would be hard to top the cuteness of that fabric, so I was pleased and surprised to find this super cute car fabric! Once I found it, I knew immediately I would make a road design.

So adorable!

Since there were four car colors, I bought coordinating solid fabric for each of them, but ultimately decided on a more limited color palette. (The royal blue coordinates nicely with the bird quilt I made for big sister two years ago.)


Related Posts Plugin for WordPress, Blogger...